Right off the bat, all the "darker" grays are out. We don't get too much natural light in this room since it faces east, so we need to keep it a light gray. I'm down to 4-5 favorites so we'll see what we end up with!
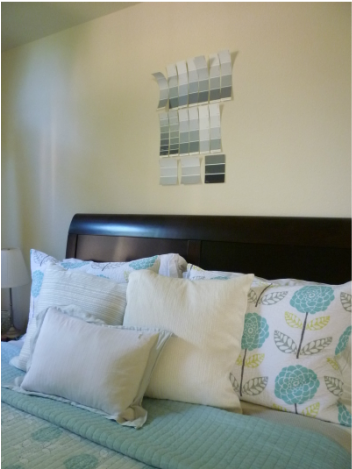
So one of my Pinterest Challenge projects was painting the bedroom a nice shade of gray. I went to a paint store that carried Benjamin Moore paints and grabbed a huge deck of paint chips. There are sooo many grays, it was unbelievable. So we taped up all the chips last week to narrow the field.
Right off the bat, all the "darker" grays are out. We don't get too much natural light in this room since it faces east, so we need to keep it a light gray. I'm down to 4-5 favorites so we'll see what we end up with!
3 Comments
I think Becky's right, all good things go into our beloved 3'x6' toilet room. Bathrooms in general have a special place in my heart and when I think about our house, the most finished rooms are our bathrooms! Anyway, I've been eyeing this magazine rack from CB2 for a while now. I liked it right off the bat. I love the simple, modern design, the low profile against the wall and the amount of magazines it can hold. I didn't like how it's $40 so I never got it. Plus, CB2 is in the city so it's a bit of a hassle for me to go and I didn't want to buy it online because I'm too cheap to pay for shipping. Haha. After keeping an eye out for magazine racks in general for the toilet room, I became more and more convinced this was the one. Others are either ugly, over-designed or not any cheaper. So this past weekend since I happened to be meeting someone in the city, I decided to splurge and took this magazine rack home with me. (Full disclosure: My home furnishing budget is not happy this month at all. I think I need to go on a shopping fast. *Sigh.) Anyway, we mounted it last night! I used the following trick to help with the mounting and it really made things much easier! You basically tape a sheet of paper to the thing you wanted to hang and mark the holes on the paper with dots. Then hold it against the wall (using a leveler to ensure straightness) until you like the position. Then simply tape the paper to the wall, remove the object you are trying to hang and drill through the dots you marked. Easy peasy. Here's my paper with the dots marked. (Bad lighting in this picture.) Then we just drilled holes, tapped in the anchors and screwed the screws in. We realized that you have to make sure your screws are perfectly perpendicular to the wall to ensure everything remains level at the end. And here is it is on the wall! I think it's absolutely perfect! It picks up the white from the stencil pattern on the back wall and just looks perfect here.
I think this is probably the most procrastinated project to date. I wanted a hall photo collage since we bought the house. I finally got some frames from Michael's and Ikea earlier this year. Probably 6 months after that, we finally selected pictures, got them printed and framed them. The frames have been sitting against the wall in the hall and it never bothered us enough to just hang them. It's really not that hard, I don't know why we didn't just do it. The hardest part about photo collages is probably laying them all out on the floor and settling on a configuration that you like. This is where we landed (sorry for the strange angle in this picture) Then I just cut paper to the same sizes as the frames and posted them on the wall to see how everything looks on the wall. Hall collages like this are very forgiving because nothing is really aligned to anything. So there's lots of wiggle room. It was a bit of work to figure out where to nail the hangers, but it wasn't too bad. Well, not that I did any of the measuring. :D The last thing thing I did to make sure the frames don't shift is tape the frames to the wall using painter's tape (after checking it was level first, of course).
And that's it! I realized at the very end that taking a picture from this angle captured the collage better. Oh well. :) I'm on an organization/streamlining streak. The sad thing is it's making me really happy. Haha. :) We don't have a laundry room (who does around here?) and I've been thinking of a solution for clothes that need to be hung dry. I wanted something that can hang 5-6 things at once and not take up too much space. I went to TCS last week and saw this awesome space-saving, super functional product. The construction felt really solid and it was $6 (I checked amazon later and it was $8+ there!). We installed it last night and took it for a test run. After filling it up with wet clothes, it still felt really sturdy and secure! (Oops, ignore the mess in the picture.) And this is the best part. It "folds up" after I'm done! It's like it's not even there! I give the person who designed this my engineering nod of approval.
Wish I took a picture of what the pantry looked like before! It was basically a mess. I went to Ikea few months ago and found the Rationell Variera boxes below. It was made for this pantry! Perfect in depth and 3 of them fills the length! Plus it's sturdy, white and roomy. I also got some glass jars for the pasta & sugar. And the Ljust jar with lid to store the quinoa, flour and other grains. I love how organized the pantry is now! Really easy finding everything and it just feels good when I open the doors. I had started the whole kitchen organization thing a few weeks ago. First I pinned a ton of pictures to Pinterest. But my first move was buying a turnable at Home Goods last week to organize our herbs. So far so good! I am now able to find and easily reach my most-used items, which was the goal. I was feeling mighty motivated last night after laying out the projects for the Pinterest Challenge that I decided to go to The Container Store after dinner. I've actually been wanting to go to TCS for a few weeks now but never had enough time to make the trip. The closest one to us is in Santana Row, which is around 20 minutes from here. I always thought TCS as a place that sold things with too-high of a price tag. We have an Elfa storage system in our closet courtesy of the previous home owners. Last year we went to TCS to buy a drawer and even with a coupon it was $100+. So I had a skewed memory of this place. When I went last night, I was pleasantly surprised by how affordable many of the items were! I saw lots of large tote/storage bags for $15! Anyway, when I walked in, I immediately restrained myself from browsing every aisle because I knew I didn't have the time and walked to the kitchen storage section. Thank God! All shelving is currently 25% off! And the original prices were already much lower than Lowe's or Home Depot. I grabbed a bunch of these cabinet shelves and undershelf baskets in all sizes. I grabbed more than I needed so only have to make one trip back to return what I didn't need. And this is how our cabinets look now! TCS is now officially one of my favorite stores. Too bad (or thankfully?) it's kind of far away. I love how organized it is. :) It just feels so good. And the total cost came it at around $25.
During lunch, I went to Home Goods to return an extra turntable I bought for our kitchen cabinets organization (will post about those soon!). The problem with Home Goods is whenever I go and return something I always end up buying something else. And it was no exception today. *Sigh. I walked in and immediately a Coach purse caught my eye since it had a red clearance tag on it. (It looks exactly like the one below except it's blue with smaller C's). I don't own a Coach purse and I don't need one, but I don't mind owning one if it's a good deal! I saw that the purse was marked down to $59 from $79. The MSRP is $148. Wow, sixty bucks for a purse. The most I've ever spent on one is $30. But who am I kidding? it's Coach and I'm sure this is considered a good deal since it's 1/3 of the original price. I couldn't decide on the spot whether I really want it or not so I just decided to buy it so I can think about it at home. (I do that a lot, by the way). After I finished checking out, I looked at my receipt and it says $6.39! No, that was not a typo. It was six dollars and thirty-nine cents! I don't know about you guys, but this is the best deal I've ever had in my life. I'm definitely keeping the purse! Hooray! Update: Here's the receipt and what the purse looks like!
My friend Lokuo asked me if I were interested in a Pinterest challenge (see her post to read all about it). I love how she's always coming up with new ideas, first the 30-day thanksgiving and now this. :) Of course I'm in since I pin way too much anyway and I have bought quite a few items I've pinned. *sigh. I think Pinterest should get paid whenever someone purchases what s/he pins. They'll be well-funded for sure. Since September is a busy month for me, I was thinking about making this a 2011 challenge so I would have around 3 months to finish the projects. 1. Bench Makeover I've had these two benches for a while now (only 1 pictured below). I got them off CL, $15 for the pair! I'm sure they can only look better from their current state. I'm thinking about refinishing the legs (which actually looks fairly decent), reupholstering and then tufting the upholstery, like below. I'm thinking about sticking with soft cream/white linen and making this a neutral piece. I've even pinned a tutorial on how to tuft. 2. Freshen up the Master Bedroom with Paint Our bedroom has beige walls. It's safe, but not pretty or peaceful. And it has no character. So I'm thinking about painting it gray for a calmer, more mature feel to it. Haven't decided on the exact shade of gray but I'm liking the following grays in the inspiration photos from Pinterest. Will have to get swatches to see how they look on our walls. 3. Completing the Guest Bathroom The guest bath is actually pretty finished already, but I feel like it's a tad dark in there (no windows, minimal lighting). Maybe I can do something to it before my sister visits me in Dec. :) Yes, that'll be my motivation! I think adding white/cream stripes to the beige wall would lighten it a bit and make it look more polished. The best part is we should already have this paint somewhere since the previous owners left us some paint! I'm crossing my fingers that we have enough. 4. Add Organization I love a organized and clutter-free home, and I've pinned quite a few things I've liked. Like adding a paper towel dispenser inside bathroom cabinets. So genius and easy. And adding cabinet organization in general to our kitchen. This is just a no brainer. We can store so many more cups/plates/bowls in one cupboard this way and maximize vertical space. I've actually organized our pantry already. I just need to take a picture and post about it.
I just realized I had gone over the 30 days of giving thanks that we originally intended! Oops. Thank God, though, it actually wasn't hard giving thanks for something everyday. Although I do admit that some days were harder than others.
It was a relief to me after the whole experience that it didn't change my life. I guess that was good and it meant that I wasn't completely failing on the giving thanks department. It was nice having to put thanksgivings in words everyday, though, as it makes it super clear what I was thankful for and have time to let it sink in. Most days I was just thankful that I had another peaceful day, so it was nice to be forced to think of more specific things each day. I brought the work laptop home this weekend so this morning when I got to work, I had to plug everything back in.
I was standing up over the pen holder at one point trying to put the plug in. I leaned in to push the plug not realizing that there was a ruler in my pen holder. (I guess it was so tall and close to my eyes that I couldn't see it). When I leaned in, both of my eyes Immediately closed themselves as the ruler jabbed into the corner of my right eye. It hurt so much that I automatically recoiled backward. I was panicking thinking that maybe some damage was done. I raised my hand to touch touch my eye, expecting to feel some blood. Thank God! There was no blood. My eye was fine. What a relief. |
Archives
March 2015
Categories
All
Current ProjectReupholstering & Tufting 2 Benches |